
While building a website yourself is an option, hiring a professional agency ensures quality and reliability. Make sure to choose wisely based on your specific needs and budget.
Before we jump into how to create a website for free, let’s first tackle the basics: What exactly is a website?
A website is like your digital storefront on the internet. It’s where people can learn about your business, find your products or services, and get in touch with you. Just like a real store, you want your website to look good, be easy to navigate, and provide helpful information. That’s where Buzzz Booster’s Custom web design and development team comes into play. With Buzzz Booster, you can trust that your website will not only meet but exceed your expectations. Their experienced team specializes in creating visually stunning and user-friendly websites tailored to your unique needs. Whether you’re a startup, a local business, or an established enterprise, Buzzz Booster is your go-to solution for professional website design and development.
Typically, a business website consists of 4 pages: a homepage, an about us page, a services page, a contact us page, and sometimes a blog for sharing relevant topics and improving website ranking.
In today’s digital landscape, it’s challenging to create a unique website due to the abundance of templates and themes available online. That’s why, if you want a website that stands out or requires a fully custom-made design, Buzzz Booster is your ultimate solution. With Buzzz Booster’s expertise in web development and SEO, we specialize in creating custom-made websites that not only reflect your brand’s identity but also optimize it for search engines, ensuring maximum visibility and reach to your target audience.
While it’s possible to create a website for free, the options are somewhat limited. Among the most well-known free website builders is Google Sites, which offers a straightforward platform for creating and publishing your site on the internet at no cost.
However, it’s important to note that websites created for free on platforms like Google Sites typically do not come with a unique domain name. Instead, they are hosted as subpages under the Google Sites domain. For example, your website URL might appear as
https://sites.google.com/view/business-booster-with-rohit/business-booster.
If you prefer a custom domain name for your website, you have the option to purchase one separately. Additional charges may apply for this service, but it offers the advantage of giving your site a more professional and memorable web address.
Before creating free website, Let’s see the cost of website development by agencies in India
Understanding the costs of website design and development in India
When it comes to creating a website, there are several important factors to consider, each contributing to the overall cost. Whether you’re just starting out, running a local business, or managing a large enterprise, having a clear understanding of these costs is crucial for establishing and expanding your online presence.
1. Domain, Hosting and SSL Certificate:
Domain: Your website’s address is known as its domain (example: www.yourwebsitename.com). opt for a simple and memorable domain name that reflects your brand identity.
Hosting: This is where all your website files are stored. The performance of your hosting service directly impacts your site’s speed and reliability. It’s advisable to choose server locations close to your target audience for optimal performance.
SSL Certificate: SSL (Secure Sockets Layer) certificate ensures that data transmitted between your website and its visitors is encrypted and secure. It provides a layer of security and builds trust with your audience, especially if you’re handling sensitive information like payment details. Many hosting providers offer SSL certificates as part of their packages, but you may need to purchase one separately depending on your needs.
Cost: In India, domain prices typically range from ₹87 to ₹784, while hosting plans vary from ₹199 to ₹1699 per month.
2. Website Design and Development:
A professionally designed website enhances your credibility and establishes trust with your audience. It serves as your 24/7 online office, providing potential clients with essential information about your business or services.
Basic Website Cost: For a small business or personal website, you can expect to pay anywhere from ₹12,500 to ₹35,000.
eCommerce Websites: If your website requires additional features such as payment gateways, product catalogs, and shopping carts, the costs may range from ₹15,000 to ₹55,000.
3. Maintenance and Renewals:
Regular maintenance is essential to ensure that your website functions smoothly and remains secure. Don’t forget to renew your hosting plan and domain registration on time to avoid any disruptions.
Risks of Self-Maintenance: Managing your website on your own can be risky, as forgetting to renew your subscriptions could result in your site going offline.
Agency Responsibility: Consider assigning the responsibility of maintenance and renewals to the agency that developed your website. They’ll handle all necessary updates and ensure that your website remains accessible to your audience.
Know how to create a free website using Google Sites
If you prefer a video tutorial, here’s a YouTube video covering the same content for an easier and more practical understanding. It will guide you through the process step by step.
NOW, LET'S EXPLORE A STEP-BY-STEP GUIDE TO CREATING A WEBSITE USING GOOGLE SITES
Before Starting make Sure You have a Gmail account or create a new one
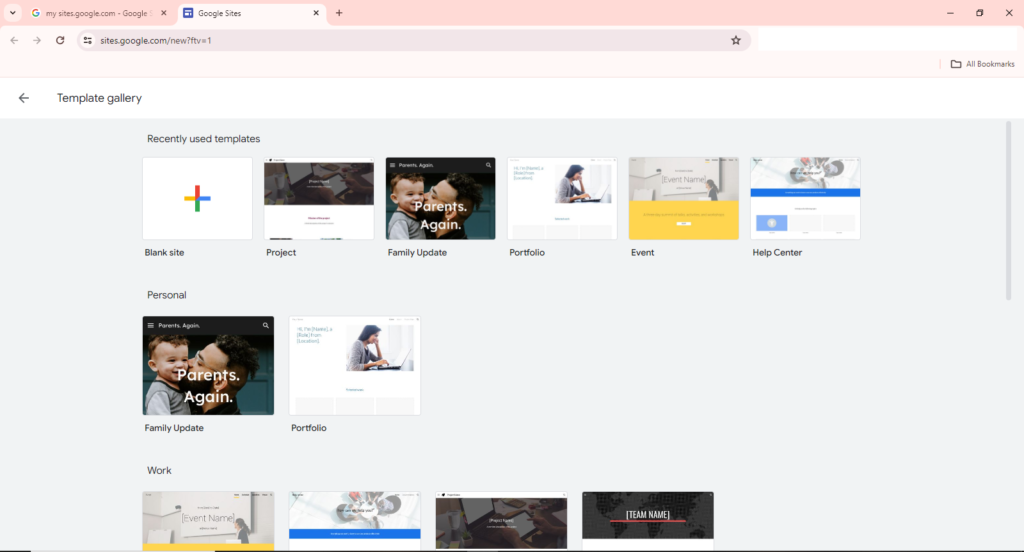
Step 1: Visit sites.google.com, where you’ll find various templates to choose from. If you like any of them, you can choose one. If none suit your preferences, you can opt for a blank site.
Step 2: Add your content; it is very simple thanks to the built-in tools provided by Google Sites. On the top right side of the screen, you’ll find three options: insert, pages, and themes. From here, you can add new pages, modify themes (with limited adjustments available, you can change the font, size, color, and background page color only), and You can easily add different types of content such as images, text, buttons, links, social media links etc. Additionally, being a Google website builder, you have the option to integrate Google Sheets, Slides, Docs, Maps, Charts, Forms, and more, making your website more versatile and efficient.

Step 3: Once you’ve finished filling in your site’s content, you can publish it by clicking on the “Publish” button.
Step 4: Give a unique web page name for you site with sites.google.com. One thing to remember, When you do, you’ll be prompted whether or not to display your site on search engines. Make sure not to select this option, or else your site won’t appear in search engine results.

Congratulations 🎉 Your site is built and published successfully but, If you want your site to appear in search engine results quickly, you’ll need to add it to Google Search Console. But, you can’t directly add your site to the console. First, you’ll need to add it to Google Analytics for ownership verification, and only then you can proceed to add it to the Search Console.
Know how to add Google Analytics to your Google Site
As mentioned earlier, before adding your site to the Search Console, you must verify ownership, which requires adding your site to analytics.google.com.
HERE'S A STEP-BY-STEP GUIDE TO ADD YOUR SITE TO GOOGLE ANALYTICS:
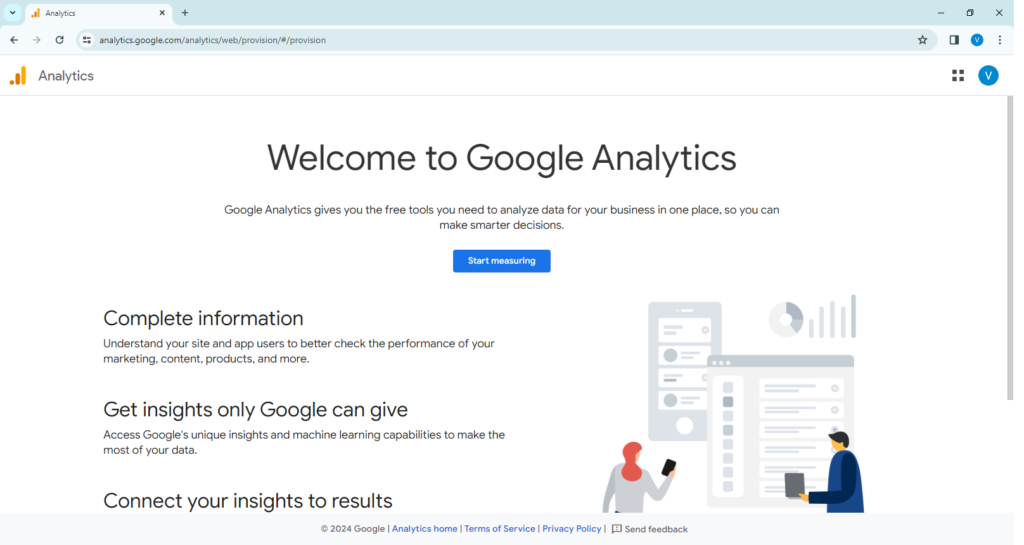
Step 1: Visit analytics.google.com – to Create a Google Analytics Account
Step 2: Click on Start measuring
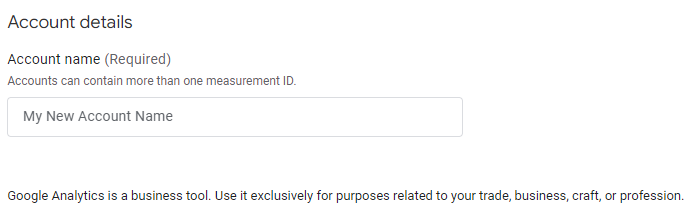
Step 3: You will be redirected to the sign-up process where you will be asked for the Account Details.
First: Account Name – Give an account name (you can choose any name; only you will see it) then, select the Google products and services checkbox.
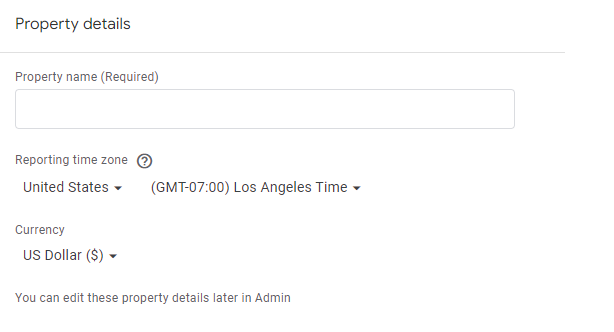
Second: Property Details – You’re required to enter the Property name, after which you can select the appropriate time zone and currency. These settings can be adjusted later in the account settings if needed.
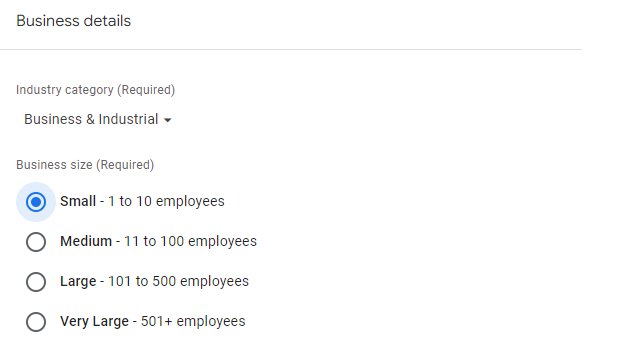
Third: Business Details – Choose your business industry and size accordingly.
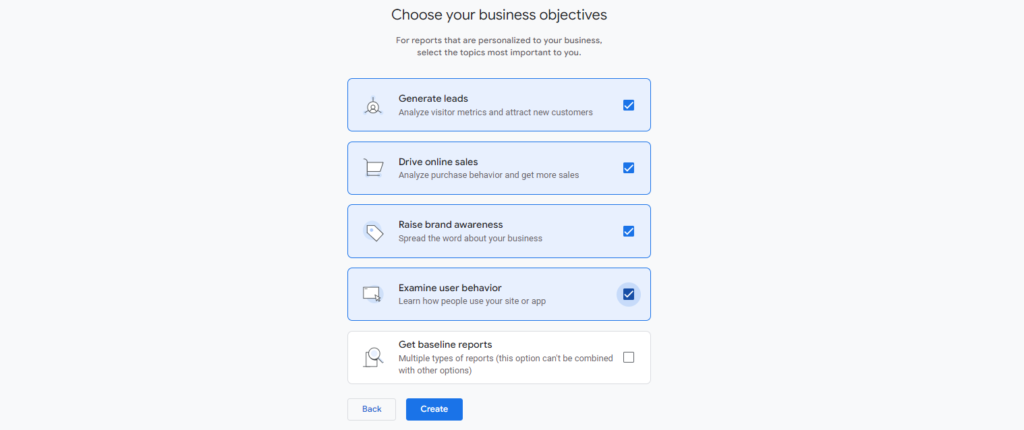
Fourth: Business Objectives – If you select the top 4 options, then you can’t choose the last one, and vice versa. Make your selection accordingly.
then, click on Create button
The Google Analytics terms of service agreement will appear, where you need to read its terms and policies. If you prefer not to read them, simply select your region, then tick the box indicating that you accept the Data Processing Terms as required by GDPR.
👇 Scroll down and again tick on the “I accept the Measurement Controller-Controller Data Protection Terms” for the data that I share with Google.
Then, click on I Accept
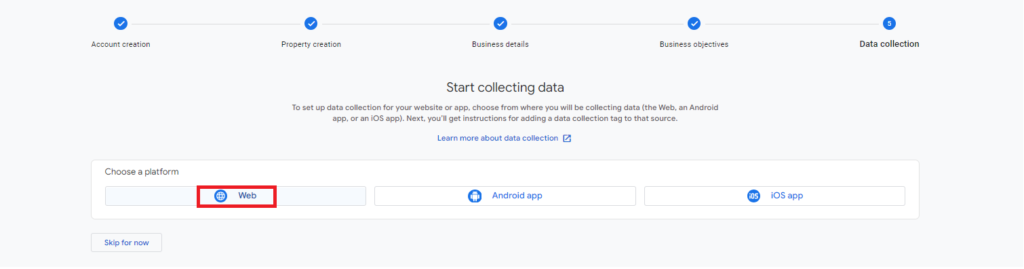
Fifth: Data Collection – It will ask you to choose a platform Web, Android App, or IOS App.
Select: Web
Now it will ask you to add your website URL and Stream Name.
Add your published website URL and remove https:// then, give a stream name.
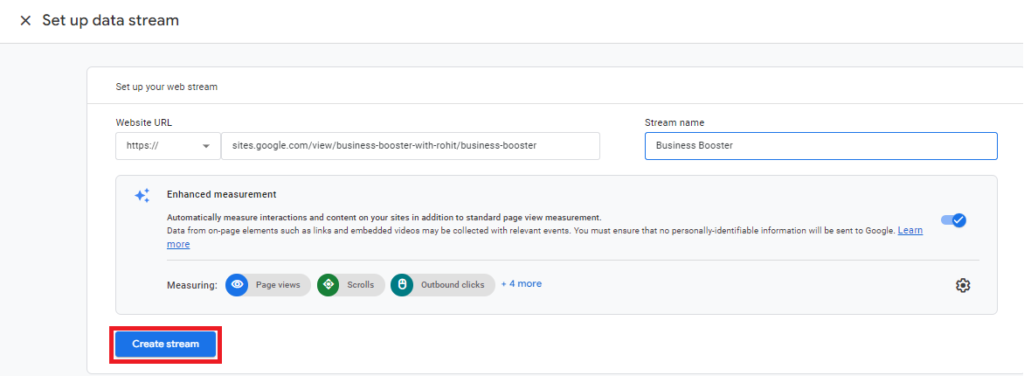
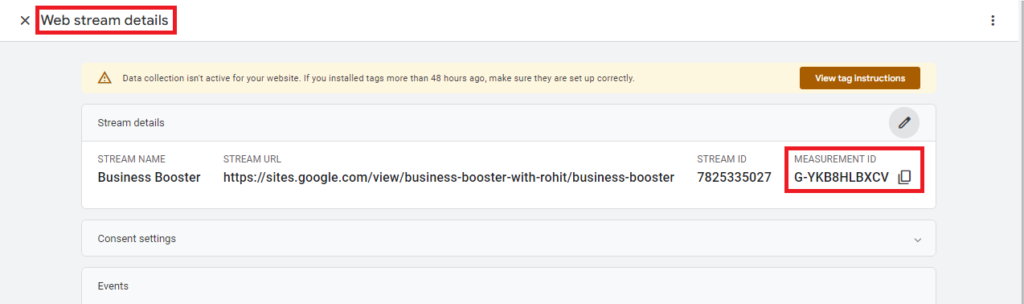
And then, click on Create Stream Now, a page will appear as “Installation Instructions” offering two options – 1. Install Manually, 2. Install with a website builder or CMS. Don’t worry, I won’t ask you to do any coding here. Simply close it, and you’ll see your Web Stream Details. Here, you will find a Measurement ID (e.g. ID G-79BE2LRPRH). Just copy it.
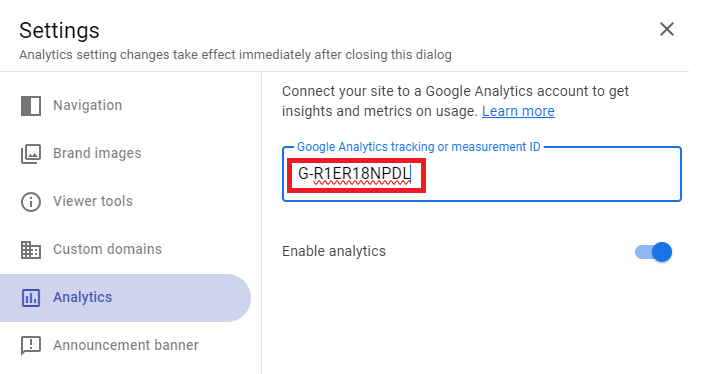
Step 4: Return to the edit page of your website on Sites.Google.com. In the top right corner, you will find a settings icon. Click on that, then navigate to analytics and paste the Google Analytics Code here. It will be automatically added to your website.
Hurrah! Google Analytics code successfully added 🎉 . Now you can check your website’s analytics, just go to the analytics.google.com.
Adding Google Analytics to your website offers benefits such as:
- Understanding your website’s traffic sources and user behavior.
- Tracking performance metrics and conversions.
- Identifying popular content and optimizing user experience.
- Making data-driven decisions to improve marketing and website effectiveness.
Now, your site is ready to be added to google search console
Add your site to Google Search Console to rank higher
HERE'S A STEP-BY-STEP GUIDE TO ADD YOUR SITE TO GOOGLE SEARCH CONSOLE:
Step 1: Visit search.google.com/search-console
Step 2: Click on Start Now – It will be redirected to this page, shown below in the image.
Here, You will see 2 options
- Domain – for adding your website’s unique Domain name
- URL Prefix – for adding subpages of your website
Because your website is a sub-directory of Google Sites, you can only add it to the the URL Prefix option

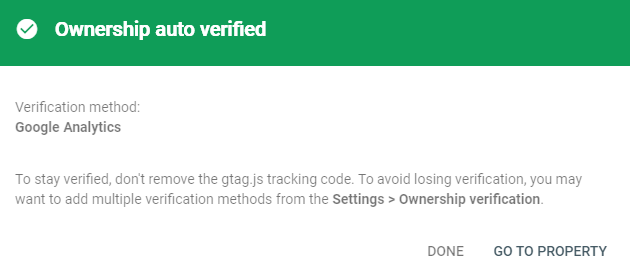
Step 3: Paste your website URL to the URL Prefix – Now, you will see that ownership is verified, and hence your site will be added to the Search Console, ready to shine on Google Search Engine Result Page.
Click on Go To Property and it will help you optimize your site for better visibility and performance in Google search results.
Note: It may take hours or several days sometimes.
If you get any problem, just don’t worry about that. We have a dedicated YouTube Video for that. Watch the Video to understand it more effectively.
This is how you can create a website for free using Sites.Google.com
Hope you found this tutorial helpful! If you did, head over to Instagram and tag Buzzz Booster for discounts on your first website development with us.